Vault7: CIA Hacking Tools Revealed
Navigation: » Directory » Embedded Development Branch (EDB) » EDB Home » How-To Articles » EFI/UEFI Information
Owner: User #71491
Setting Up a Linux Build Environment for EFI
('toc' missing)
This page will walk you through building a build environment for a Linux machine. Specifically, this tutorial is focused on Ubuntu/Linux Mint.
Specific Ubuntu Configuration Details
The first step in setting up the development environment is making sure that you have a working Ubuntu machine. You can use an actual Ubuntu DEVLAN machine or an Ubuntu VMVirtual Machine on your DEVLAN machine.
This page will not go into detail about how to install Ubuntu or create an Ubuntu VM, but will focus on the few ways you'll configure the Ubuntu machine before you can install and set up the UDK.
First, you need to modify your sources.list file so apt-get can use the DEVLAN repos, located at repo.devlan.net. Linux Package Repository Mirrors setup discusses a few ways to do that.
Once you have set up Ubuntu to run properly, run the following commands to update and upgrade your packages and download the ones needed for the UDK.
sudo apt-get update
sudo apt-get upgrade
sudo apt-get install build-essential uuid-dev iasl nasm git
At this point, you should have all of the dependencies for the UDK that are not included in the UDK package itself, and you are ready to install the UDK.
Installing the UDK
The first step in setting up your development environment is to install the UDK, in this case, the TianoCore EDKEmbedded Development Kit II (http://www.tianocore.org/edk2). This is the open source environment for UEFIUniversal Extendible Firmware Interface and PI development.
Start by downloading all of the source files for the project. These are located on Stash, under the OpenSource/edk2 project. A link to that project is here.
mkdir ~/src
cd ~/src
git clone http://USERNAME@stash.devlan.net/scm/quarkmatter/edk2.git
cd edk2
make -C Basetools/
export EDK_TOOLS_PATH=$HOME/src/edk2/BaseTools
mkdir Conf
. edksetup.sh BaseTools
Note: if you cloned the QuarkMatter version of edk2 instead of the OpenSource version, you may have gotten a "cannot create dirrectory 'Conf': File exists" error. That is fine; I added the Conf files with their changes to that directory for QuarkMatter-specific builds.
If this succeeded, your output should be similar to the output below:
bash$. edksetup.sh BaseTools
WORKSPACE: /home/user/src/edk2
EDK_TOOLS_PATH: /home/user/src/edk2/BaseTools
Copying $EDK_TOOLS_PATH/Conf/build_rule.template
	to $WORKSPACE/Conf/Build_rule.txt
Copying $EDK_TOOLS_PATH/Conf/tools_def.template
	to $WORKSPACE/Conf/tools_def.txt
Copying $EDK_TOOLS_PATH/Conf/target.template
	to $WORKSPACE/Conf/target.txt
At this point, you have built the BaseTools components and set up the build shell environment. The next step is to configure your installation to use the correct GCCGNU Compiler Collection compiler. First, determine your GCCGNU Compiler Collection version by using the command below.
bash$ gcc --version
gcc (Ubuntu4.9.2-10ubuntu13) 4.9.2
Copyright (C) 2014 Free Software Foundation, Inc.
This is free software; see the source for copying conditions.  There is NO
warranty; not even for MERCHANTABILITY or FITNESS FOR A PARTICULAR PURPOSE
According to the above output, the machine is using GCCGNU Compiler Collection version 4.9.2. For the purposes of configuration, this will be referred to as "GCC49".
Next, open up the Conf/target.txt file and find the following lines:
ACTIVE_PLATFORM		=Nt32Pkg/Nt32Pkg.dsc
TOOL_CHAIN_TAG		=MYTOOLS
TARGET_ARCH			=IA32
and change them to the following:
ACTIVE_PLATFORM		=MdeModulePkg/MdeModulePkg.dsc
TOOL_CHAIN_TAG		=GCC49
TARGET_ARCH			=IA32 X64
Note: if your Ubuntu machine has a different version of GCC, use that number above instead of GCC49.
Now, you need to build the project. The command and some of its output are below. Note: give yourself a few minutes for this to run to completion, as it will take a little while.
bash$cd ~/src/edk2
bash$build
Build environment: Linux-3.19.0-15-generic-x86_64-with-Ubuntu-15.04-vivid
Build start time: 14:18:08, Aug.11 2015
WORKSPACE        = /home/user/src/edk2
ECP_SOURCE       = /home/user/src/edk2/EdkCompatibilityPkg
EDK_SOURCE       = /home/user/src/edk2/EdkCompatibilityPkg
EFI_SOURCE       = /home/user/src/edk2/EdkCompatibilityPkg
EDK_TOOLS_PATH   = /home/user/src/edk2/BaseTools
Architecture(s)  = IA32 X64
Build target     = DEBUG
Toolchain        = GCC49
Active Platform          = /home/user/src/edk2/MdeModulePkg/MdeModulePkg.dsc
Processing meta-data ....


<LOTS OF MAKEFILE AND OTHER BUILD OUTPUT HERE>


- Done -
Build end time: 13:51:03, Aug.11 2015
Build total time: 00:06:34
bash$
Another note: if you get a "No command 'build' found" error, re-run the edksetup.sh script. The command to do this is: ". edksetup.sh" Make sure to use the "." at the beginning of the command, or it won't work.
At this point, presuming that the build did not give you any errors, you have successfully built the build environment for EDKEmbedded Development Kit II. The next step is to understand how to create a basic EFIExtensible Firmware Interface executable, which will be covered in the next section.
Creating and Building a Basic EFIExtensible Firmware Interface Package
This section is dependent on having a working EDKEmbedded Development Kit II build environment. If you have not done that already, please go back to the section above and build your environment.
This subsection will walk you through creating a basic "HelloWorld" style EFIExtensible Firmware Interface program and how to use EDK2 to build it.
Creating Your EFIExtensible Firmware Interface Package
EFI Package and Its Components
EDK II's basic build structure is centered around packages, which are used to contain multiple modules (which are eventually built into EFIExtensible Firmware Interface executables.)
Using the UEFIUniversal Extendible Firmware Interface Driver Wizard to Create a New Package
The UEFIUniversal Extendible Firmware Interface Driver Wizard is a tool created by Tianocore (the same people that published EDKEmbedded Development Kit II) designed to make it easier to create new EFIExtensible Firmware Interface drivers and packages. It automates some of the basic tasks that you would need to complete in order to create a new package.
It source can be found on the open internet at https://svn.code.sf.net/p/edk2share/code/trunk/DriverDeveloper/UefiDriverWizard, and a brief description can be found at https://github.com/tianocore/tianocore.github.io/wiki/UEFI-Driver-Wizard.
Setting up the driver wizard is very simple: use Subversion to check out the code, create a directory in your Ubuntu machine for it to all go into, and copy it there. Then, navigate to that directory and run the launch.py script, which will launch the GUI.
Presuming that you are storing the driver wizard code in the src folder you made above and that your code was originally in ~/Downloads/UefiDriverWizard, the commands to do all of that are as follows:
cp -r ~/Downloads/UefiDriverWizard ~/src/
cd ~/src/UefiDriverWizard
python launch.py
From here, the GUIGraphical User Interface will launch. The first step is to go to the UEFIUniversal Extendible Firmware Interface Driver Wizard menu and select "Open WORKSPACE." This will configure the wizard to use the Workspace that you configured earlier, namely "~/src/edk2". Select that folder and hit "Open."
Now the wizard is configured to use your workspace. The next step is to create a new package, using File->New Package. This will open up a dialog box that lets you determine the name, package GUID, package version, and platform GUIDGlobally Unique Identifier for your package.
Below is a screenshot showing the options that I used. Note: your GUIDs may not be the same as mine. That is fine, as GUIDs by nature are generated randomly and this walkthrough will not refer to a GUIDGlobally Unique Identifier by its actual number.
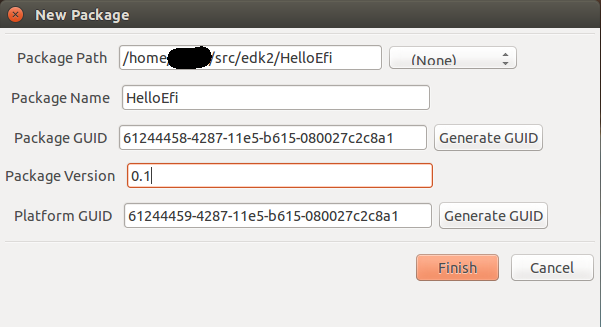
Once you have entered the package path, name, and version (the last part of the path and the name should be identical), hit "Finish".
This will generate the package declaration file (HelloEfi.dec) and the build description file (HelloEfi.dsc.) We will refer back to the dsc file once we are almost ready to build the executable at the end.
For now, we will move on to creating the Hello World C file and work through adding it to the package.
Your Source: HelloEfi.c and Your Build Information: HelloEfi.inf
The first step in creating your source file(s) is to set up the package directory structure. Although the wizard did a lot of this for you, there is still a small amount to do to set up the package in a similar manner to those provided as part of EDKEmbedded Development Kit II.
The following commands will set up the directories as needed. The commands assume that your package name and path are identical to those in the screenshot above.
cd ~/src/edk2/HelloEfi
mkdir Library
mkdir Library/HelloEfi
cd Library/HelloEfi
Once you are in the Library/HelloEfi directory, it is time for you to create your C file, HelloEfi.c
Feel free to mess around with this file if you want to try more complicated things, otherwise, the source for this file is below:
/** @file
    This is a basic Hello World EFIExtensible Firmware Interface program
**/
#include <Uefi.h>
#include <Library/UefiApplicationEntryPoint.h>
#include <Library/UefiLib.h>
EFI_STATUS
EFIAPI
UefiMain (
  IN EFI_HANDLE            ImageHandle,
  IN EFI_SYSTEM_TABLE     *SystemTable
)
{
    Print(L"Hello EFI! \n");
    return EFI_SUCCESS;
}
This code has three #includes. However, the header files that they refer to are not included in the HelloEfi package. Instead, they are part of the MdePkg, the main package provided as part of EDKEmbedded Development Kit II.
In order to configure your HelloEfi package to know where those header files are and to know which of those includes are library classes, you will need to create the build information (INF) file.
Similarly to the C file, this file will be located in HelloEfi/Library/HelloEfi/ and named HelloEfi.inf . Its source is below:
##
#    Inf file for HelloEfi.efi
##

[Defines]
    INF_VERSION            =0x00010005
    BASE_NAME              =HelloEfi
    FILE_GUID              =ef6a784a-f1ee-4f75-ac0b-ba8f0869a2f2
    MODULE_TYPE            =UEFI_APPLICATION
    VERSION_STRING         =0.1
    ENTRY_POINT            =UefiMain

[Sources]
    HelloEfi.c

[Packages]
    MdePkg/MdePkg.dec

[LibraryClasses]
    UefiApplicationEntryPoint
    UefiLib

[Guids]

[Ppis]

[Protocols]

[FeaturePcd]

[Pcd]
At this point, you now have your source C code and your build information for that particular executable. The next step is to add that .inf file to your build description file for the entire package.
DSC: Build Description File
HelloEfi.dsc, located in ~/src/edk2/HelloEfi/ , is the build description file for the entire package. This file defines information such as naming and version number for the package, as well as naming its imported library classes and the components to build from within the package itself. The UEFIUniversal Extendible Firmware Interface Driver wizard created most of this file for you earlier, so now the only thing to modify is the [Components] section to add your new HelloEfi.inf file.
In order to do this, open up HelloEfi.dsc in your favorite text editor and scroll down to the [Components] section. In that section, add the path from your edk2 folder to the inf file, as shown below:
<the LibraryClasses section ends>

[Components]
  # THE LINE BELOW IS WHAT YOU NEED TO ADD
  HelloEfi/Library/HelloEfi/HelloEfi.inf
  # ADD THE LINE ABOVE
As a side note: one concern with the driver wizard is that it is configured to using DOS/Windows newline characters. That means that if you open up the DSC file in Vim, you will see that the file is in DOS format, and Vim will render a "^M" character at the end of each line.
You will need to fix this so your package can be parsed properly on your Ubuntu system. You can either manually delete each of the "^M" characters, or, in VIm, type the following command:
:%s/^M//gIn order to get the proper "^M", you need to type CTRL + V, then CTRL + M. Typing "^M" will make it search for those literal characters, not 0xD.
Now that you have your DSC file formatted for Unix and pointing to your INF file, you are ready to build!
Building the Package and Locating the Executable
Navigate back to the edk2 directory, and run the following commands to build your package and navigate to the folder where your EFIExtensible Firmware Interface executable is placed.
. edksetup.sh
build -p HelloEfi/HelloEfi.dsc
cd Build/HelloEfi/Debug_GCC49/X64
<HelloEfi.efi is in this directory!>
Building EFIs from the PocPkg Directory within the QuarkMatter Repo
The next step is to understand how to build code from the QuarkMatter repo within the UDK. One possible solution would be to place the clone of the QuarkMatter repo within a subdirectory of your EDKEmbedded Development Kit root (~/src/edk2). However, in order to make it easier to deal with using git (instead of having to populate the .gitignore with all of the other files that are built), we will instead place symbolic links in the UDK root directory and then build off of those links.
In order to make the links and build the package, you will need to run the following commands:
cp -rs /$PATHTOQUARKMATTER/quarkmatter/PocPkg /home/user/src/edk2/   	#Create the symbolic links
cd /home/user/src/edk2													#Navigate to the edk2 directory for build
. edksetup.sh															#Make sure the environment variables are set properly
build -p PocPkg/PocPkg.dsc												#Build the package as if the source was actually in the edk2 directory tree
cd Build/PocPkg/Debug_GCC49/X64											#Navigate to the location of the resulting EFIExtensible Firmware Interface binaries
This process can be applied to any other packages that are not in the edk2 directory that you want to build.